Sunday, July 22, 2012

Wart, wart...oh beware!!

I write this post quite ecstatic!  And a little bummed at the same time.

1.  I am ecstatic that we found a natural way to make my 5 year olds wart disappear, I hope we killed it and it has not just temporarily disappeared.
2.  Bummed that I did not take pictures of the wart before we started.  (I think, honestly, I did not think this would work, so why take a picture.  Right?  Get me?)

Any way, this is soooo simple and amazing.

Months ago we noticed a spot on our 5 year olds wrist, I honestly thought it was poison ivy.  So, I didn't do anything about it except to tell him not to scratch it.  Well, after weeks went by and the "poison ivy" did not disappear, and a little black seed started to grow in the center, we figured out it was a planters wart.  I had them on my hands when I was younger too, so I could relate to the little guy.

So, you know me, I headed to google.  I found two different and weird recommendations.  One was to cut a very ripe banana peel and duct tape the banana peel to the wart at bed time.  Ok, I wasn't going to put duct tape on his skin, but I could use athletic tape.  So, we did this for a few nights.  Then we ran out of bananas.  (Ever try to keep the skin of a banana??  It turns all black and nasty, even in the refrigerator.)  So, onto recommendation two.

Organic apple cider vinegar.  So, we started rubbing ACV all over the wart at bed time with a q-tip, covering it in white athletic tape and guess what???  THE WART IS GONE!!!  I think it took about 2 weeks from start to finish.

An amazing discovery!  We did not have to go to the doctor or purchase the wart freeze stuff you see on T.V. with who knows what kinds of chemicals in it.

YAY!!! Score another point for safe, at home ways to heal problems.  LOVE IT!!

I will keep you posted on whether our not the wart remains gone.  :-)  I am optimistic that it is dead.  So, warts our there...BEWARE!

*Since I wrote this I have became a doTERRA girl.  The most AMAZING essential oils!  My son developed a second wart.  We tried the apple cider vinegar for months and the wart never died.  I researched my doTERRA oils and found out that Frankincense and Clove work for warts.  So, after 2 weeks of using the Frankincense the wart was almost DEAD (still using the same method, putting the oil on the wart and covering the wart with athletic tape, then going to bed)!  We then started alternating nights of Frankincense and Clove and the wart is completely gone!!!  doTERRA Essential Oils ROCK!!!!!!  www.itstimetogreen.com and click on the doTERRA link to learn more.

Wednesday, July 18, 2012

Free Range Roast Chicken Dinner

See this little chicken?  This chicken is going to be our dinner tonight.  


Seasoned with olive oil, salt and pepper.
Not too long ago this little chicken was running happily around a farm with green grass in Decatur Indiana called Pasture's Delights.  Enjoying life like a chicken should.  Out in the open, breathing fresh air, eating a diet that has not been genetically modified, not being pumped full of antibiotics but living a happy chicken life.  This chicken was not piled 7 stories high in a chicken house with 100,000 other chickens who have been fed or injected steroids, who are pooping on one another constantly and living in a stinky chicken house that is 100 degrees plus.  


Anyway you get my point...know where your chicken comes from.  And buy chickens that were healthy from the beginning, not sickly little birds barely existing.  You want to be healthy, so make sure your food is healthy when you buy it.


Please visit Pasture's Delights website and please read Farmer Mark's information comparing pastured chicken verses conventional chickens.  I just bought my last organic chicken breast from Costco.  Though it is organic, the chickens are not raised humanely.  So, it's all local chicken for us from here on out.  :-)  


Here is the link to Pasture's Delights chicken information

This is an actual picture of the chicks at Pasture's Delights Farm.

This recipe is so easy and delicious, you will be pleased all around.  The white meat is as moist as the dark meat.  Soooooo good!


Roasted Chicken Dinner
Whole chicken, free range pastured chicken 
1 Tbsp Kosher salt (I don't know why kosher and not sea salt...need to do more research here)
1/2 tsp black pepper
2-3 Tbsp olive oil
Total time:  Approximately 90 minutes


1.  Place a 12 inch cast iron skillet in oven an heat oven to 450.
2.  Combine salt and pepper in a small bowl
3.  Pat chicken dry with paper towels
4.  Rub olive oil all over chicken
5.  Sprinkle and rub in salt and pepper mixture on both sides of chicken
6.  Lay chicken, breast side up on a plate, tie legs together with twine or kite string
7.  Tuck wing tips behind back of chicken
8.  Carefully place chicken in your preheated skillet, there will be popping, be careful
9.  Roast chicken for 25-35 minutes until breast registers 120 degrees and thighs register 135 degrees.  Be very careful when taking chicken out of oven, it is obviously very hot and there are some popping going on too
10.  Turn oven off and leave chicken in oven, still in the cast iron skillet for another 25-35 minutes until breasts register 160 degrees and thighs register 175
11.  Transfer chicken to carving board and let rest, uncovered for 20 minutes
12.  Carve chicken and serve.  I am serving mine with steamed organic broccoli and white basmati rice.  Yum!


Let me know what you think!


What chicken looked like after first 30 minutes of roasting.


Well, it's official, I reeeally love my boys...I let them eat both legs tonight. (*sigh*)


And don't forget to keep the bones to make a delicious chicken stock.  Please refer to the Healthy Home Economist website for more info on making chicken stock, check out Sarah's video.  


Recipe adapted from Cook's Illustrated.

It's Time to Green! is on FaceBook!!!!

I finally took the next electronic/techy/2012 step.....My blog is on FaceBook.  Check it out and "Like" me if you want to receive recipes and articles that revolve around a whole food/green way of living.  Being on FaceBook seems to open up more dialog, so if you have questions/suggestions/feedback...let me hear 'em!


https://www.facebook.com/ItsTimeToGreen


Happy reading!!

Tuesday, July 17, 2012

Homemade Ranch Recipe (Powder, Salad Dressing and Veggie Dip)

Remember when it comes to spices and dairy...it's all ORGANIC here!


Homemade Ranch Powder
2 1/2 Tbsp dried minced onions (processed in food processor or blender to make a fine powder)
1 tsp dill (process/grind with minced onions)
7 tsp parsley flakes
3 tsp sea salt (Redmon's or Celtic.  Remember real sea salt is NOT all white.)
1 tsp garlic powder

Mix all ingredients together and store in a glass jar.  Remember this is the real stuff, no junk in here, so it may clump a little.   Just open your glass jar and loosen ingredients with a butter knife before measuring.


*I have started blending everything except the salt and garlic in my bullet.  Makes a finer ranch dressing in my opinion.  :-)
I bought this glass jar at Whole Foods.


Homemade Ranch Salad Dressing
1 Tbsp of your Homemade Ranch Powder 
1 cup mayonnaise (I used Hellmans but will soon be switching to homemade mayo)
1 cup organic buttermilk (You can buy this at The Downtown Farm Stand, Whole Foods and I just called Meijer to ask them to start carrying it...keep your fingers crossed.)

Mix ingredients together and chill before serving.  I used my Pampered Chef salad dressing Measure Mix and Pour.  It worked great.  This salad dressing is sooooo good.  


Homemade Ranch Veggie Dip (I haven't made this one yet.)
1 3/4 Tbsp of your Homemade Ranch Powder
2 cups of organic sour cream

Mix together and enjoy!


Homemade Taco Seasoning


I just made a batch of my Homemade Taco Seasoning and thought it would be a good time to blog the recipe.  

I came up with this recipe 1. after learning about MSG and all the other chemicals "they" put into store bought taco seasoning  2. after a few trial and errors of different recipes I found on the internet, I tweaked those recipes a few times and came up with one that we all like.  Please feel free to tweak this recipe and sent me your suggestions.  I am always open to new recipes.  :-)

Homemade Taco Seasoning

1/4 cup chili powder
2 Tbsp onion powder
2 Tbsp ground cumin
1/2 Tbsp garlic powder
1/2 Tbsp paprika
1/2 Tbsp sea salt (Celtic is the best)
1/2 Tbsp thyme
1 tsp black pepper
1 tsp coriander
1/4 tsp cayenne pepper

Mix together, store in a glass bowl with tight fitting lid.  I use a small pyrex bowl and it all fits perfectly.  

To make tacos:
Brown 1 pound of grass fed ground beef in a cast iron skillet.  Add 2 Tbsp of Homemade Taco Seasoning to your browned ground beef, mix well.  Then pour in 3/4 cup reverse osmosis water, bring to a low boil and simmer for 5 minutes or until  most of your water has evaporated.

I also use this in my Taco Soup.  Very tasty.

Enjoy!  :-)


Monday, July 16, 2012

Kombucha-Part 2 Brewing

Ok, so with great delight I write that my "grow it yourself s.c.o.b.y." is GROWING!!!  Yay!  I just posted a picture to the Kombucha Part 1 blog post!  I am so excited!  

**Update...not only did he start to grow but he GREW into a beautiful healthy scoby that I am using for the 4th time today to brew a batch of Kombucha!  We looooove k'cha!!  :-)


Brewing Your Own Kombucha

What you need.....

-Glass jar preferable 2 gallon (has to be glass!)  Walmart has nice 2 gallon ones that I bought for $10.  **BIG NOTE here...glass container has to be big.  Measure the diameter (top of) your glass jar.  If if it 8 inches in diameter, then there has to be 8 inches of just air in the top of the jar.  There has to be adequate air flow in the jar.  You do not want your Kombucha to fill your glass jar to the top.

-4 organic tea bags or loose tea, not flavored (2 organic green and 2 organic black tea) or (2 tsp organic green and 2 tsp organic black.) (do not use decaf tea)

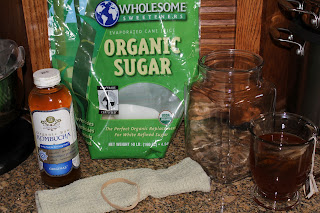
-1 1/4 cup organic cane sugar (I buy the big bag at Costco)
-12 cups (3 quarts) of Reverse osmosis water (filtered should work too)
-1 cup plain Kombucha or 1 bottle of GT's original(no flavor) Kombucha, room temperature
-Organic fruit, organic fruit juice or organic extracts (ginger, etc)
-Glass bottles (empty and cleaned with lids) NOT COLORED GLASS!!!  Clear only.*
-Wooden ladle (no metal can ever touch your s.c.o.b.y.!!)
-White cotton dish towel (never bleach these and never use colored towel)
-Large rubber band
-1 s.c.o.b.y. (if you live local to me, I will gladly give you one for free.  and your starter.)


*****Note:  DO NOT use antibacterial soap to wash the glass jar or any of the items you will use to make this Kombucha.****** (You shouldn't be using antibacterial soap either.)


What to do.....

Bring 12 cups (3 quarts) of your reverse osmosis water to a boil in a stainless steel sauce pan.  Once it is boiling stir in 1 1/4 cups of organic cane sugar.  Boil for 5 minutes to ensure all sugar is dissolved.  Remove pot from heat and turn stove off.  Place the 4 tea bags (or loose tea) in the hot, sugary water.  Let steep for 10 minutes with lid on.  (2 black and 2 green tea bags ONLY....no more.)

When the 10 minutes have passed, remove tea bags, squeezing gently to squeeze out remaining tea and place in your compost bin.  Then pour hot sugary tea into your glass jar and wait about 2 hours until the sugary tea is at body temperature ~98 degrees.  Cooler than 98 degrees is fine too.  

DO NOT EVER let your sugary tea cool overnight!!!  This is asking for mold.

(If this is not your first time brewing Kombucha, and you just left your s.c.o.b.y. in the glass brewing jar while you made a new batch of sugar tea, DO NOT pour the sugar tea over the s.c.o.b.y. until the sugar tea is cooled to body temperature or cooler.  Pouring HOT sugar tea over your s.c.o.b.y. could kill your s.c.o.b.y.)

Once your sugar tea has cooled to body temperature, you can now pour your 1c Kombucha starter or bottle of GT's original Kombucha into the sugar tea water.   

Now, with clean hands, gently lay your s.c.o.b.y. on top of the liquid.  It might sink, it might not, if it does sink it will float back to the top within 1 day.

Cover your glass jar with a clean (never been bleached) WHITE dish rag or towel and secure with a rubber band around the lip of the jar, holding the dish rag or towel in place (we don't want gnats or dust getting into our Kombucha).

Place glass jar in a safe location, that is not in direct sunlight, not in a closet, not in a kitchen where there are food particles flying around.  Somewhere that stays fairly warm and a room that does not have a ceiling fan.  76 degrees is preferable, but not a necessity.  The room needs to be a quiet room, not a room where there is a lot of chaos (which honestly is no where in my house and my Kombucha brews just fine :-) ).  Temperature affects how fast or slow your Kombucha brews.  We actually keep ours in our den.

In the hot months, check your Kombucha after 6 days, if it is starting to taste tart, bottle it now if you want a fizzy tasting Kombucha.  In the winter I let my first brew go 9-10 days before I bottle.  If you don't like fizzy, bottle and immediately place in your refrigerator.  

You will also see that your s.c.o.b.y. is growing, there should be a new layer on top.  If you ever see green mold growing on top, something has gone wrong.  There should not be blue or green mold.  Throw the batch out and start all over.  


This is what you want your Kombucha to look like when brewing.  Weird I know.


In the summer months, after about 6 days of brewing your Kombucha should be ready to bottle.  In the Winter 9-10 depending on the temperature of your house and how tart you like your Kombucha.  You are looking for a slightly sweet yet tart taste.  So, grab a utensil (NOT METAL, use a wood or plastic spoon) and taste your Kombucha brew.  You can gently press down on the top of the s.c.o.b.y. to retrieve some Kombucha on your spoon.  If you like it more sour tasting, brew for another couple of days, checking the flavor each day.


I bought this little baby on Amazon.


Temperature plays a huge roll on brewing time when it comes to Kombucha.  For example, where I live it is freezing cold right now, so I let my Kombucha brew in the brewing jar for 9-10 days, then bottle with fruit and brew another 2 days.  This is perfection for me in the winter.


In the summer, I brew for 5-7 days, then bottle with fruit and brew the bottles another 1-2 days, depending on the temperature in the house.

***When I first started brewing Kombucha I went with the shorter amount of days because I needed it sweeter.  Now that I have been drinking it for awhile I like it tarter.  And the longer you brew, the more good benefits in your Kombucha.  

When the Kombucha has reached a flavor you desire, and if you want to make it fizzy like a pop.  Follow the instructions below*.  If you do not want your Kombucha to have fizz stop here and use a kitchen funnel to slowly pour your Kombucha into your already cleaned and prepped glass bottles (do NOT use a metal ladle or spoon here).  I have been saving my GT's Kombucha glass bottles, Bionature strained tomato glass bottles and club soda bottles to use for my Kombucha, these are my favorite.  Anything glass will work with a top that you can screw on tightly. I am finding that the neck of the glass bottle determines how much fizz you get, if any from some bottles.  Don't fill you Kombucha to the top of the bottle.  Give it room to get fizzy.

*If you would like to add flavor to your Kombucha, now is the time.  And keep in mind, this is all personal preference.  You can do just about anything you want here....strawberries, blueberries, raspberries, mango, kiwi, cherries...my first batch I am going to juice organic pears and add some of the pear juice and organic ginger extract to the bottom of each of my bottles before I fill them with my Kombucha brew.  (*Update...I did not do this.  Organic pears were out of season.  So, I pureed organic strawberries.  I highly suggest juicing them, if you have a juicer, if not puree is fine but there will be pieces of strawberry when you drink this.)  You can add anywhere from 1 tsp to 4 tbsp depending on the flavor you are wanting to achieve and of course the size of the bottle.  For my GT's bottles I use 4 tbsp, for my club soda bottles I use 2 tbsp of pureed organic strawberries or strawberry juice.  (My friend Mackenzie uses blended blueberries with a small amount of grated ginger.  My friend Lisa adds Pom juice to create a cranberry flavor).  **My new favorite is thawed red raspberries.  Love!!!!

To create fizz in your batch of Kombucha.  
First, using the kitchen funnel, place funnel in the neck of your clean (recycled lol) glass bottle, pour your fruit juice, pureed fruit or cut fruit into the funnel (or bottle) and then slowly fill your bottle with your Kombucha brew, leaving an inch of room at the top.  Repeat this with your other empty glass bottles, until you have poured all but at least 1 cup of the Kombucha brew into your bottles.  Place lids on bottles.  And place bottles on your counter-top or in a cabinet but leave the door open.  You want to keep out at least 1 cup of your Kombucha brew and save it for your next batch of Kombucha you are going to brew. I just leave an inch or two in the bottom of my glass brew jar with the s.c.o.b.y. still floating in it.

Saving some Kombucha without the fruit it in saves you money.  You don't have to buy more starter Kombucha when you can use your own brew to start your next batch!  Cool huh'?  And you can save out more starter and give to a friend along with a s.c.o.b.y. baby when your s.c.o.b.y. gets too thick.  Then your friend can begin brewing Kombucha too!  We sometimes have problems getting our hands on Original GT's here, so sharing the brew and the s.c.o.b.y.'s is a must!  :-)

Let the bottles, with the fruit in them, sit for 1-2 days.  BUT remember that everyday you must burp each bottle!!  You burp the bottle by slowing twisting the cap until you hear the carbonation/pressure release from the bottle a small amount.  Then re-tighten the cap.  Repeat the next day, until you have reached the level of carbonation you like.  You can go more than 2 days but remember the longer you brew the more apple cider vinegary tasting your Kombucha will become.  Then refrigerate and enjoy!

Double this recipe to fill your 2 gallon glass jar.

Let me know when you experiment with different flavors.
Delicious.


As a recap, when you go to brew your next batch, leave at least 1 cup of your plain (no fruit added yet) Kombucha and your s.c.o.b.y. culture in your glass jar.  Slowly pour your body temperature or cooler sugar tea over the top of the s.c.o.b.y., cover, rubber band and check again in 6-7 days.

If you are not wanting to brew another batch right away, leave your s.c.o.b.y. in your glass brewing jar or place your s.c.o.b.y. culture in a large glass bowl with a lid (where the s.c.o.b.y. can lay flat), cover with plain/no fruit added Kombucha and sit in a dark cabinet or room.  I have only temporarily (2-4 days stopped brewing), so I just leave my s.c.o.b.y. on the counter top or in a kitchen cabinet.  When you go on vacation, you can (1)time it to where you bottle right before you leave, stick all of the bottles in the refrigerator and start a new batch to brew while you are gone or (2)leave s.c.o.b.y. sitting in 2 cups of plain/no fruit added Kombucha.

Double everything above to larger (double) batch.  :-)

Information from www.thehealthyhomeeconomist.com  One of my favorite blogs!!

***Some good questions that have came up from friends about k'cha.
1.  So, where should I put my glass jar if I can't use my kitchen?  Try putting it in your bedroom or den.  Some place higher up where the kids can't knock it over.  We have ours up on our desk in our den.  BUT DO NOT turn on the ceiling fan!
2.  Why can't I use colored towels?  You want the air around your Kombucha to be as clean as possible, dyed hand towels are not clean, chemically speaking.
3.  If my s.c.o.b.y. is already in the glass jar I am going to use, can I pour the sugar tea mixture on top of it?  Yes and no.  Lol  I do this all of the time but it can makes bubbles on top of my s.c.o.b.y.  So, carefully pour your body temperature or cooler sugar tea on the edge of your s.c.o.b.y.  Or just take the s.c.o.b.y. out and place it in another glass bowl, fill your glass jar with your sugar tea mixture and then gently lay your s.c.o.b.y. back on top of the sugar water.
4.  Does a kitchen cabinet make a good storage space for brewing my Kombucha?  NO.  Your Kombucha needs good air flow and moderate sunlight.  That is not available in a kitchen cabinet.
5.  Why can't I brew my Kombucha in my kitchen on the counter top?  A kitchen is a very busy place.  Food particles are flying around and you don't want to increase the chance of your Kombucha growing mold.  Which could happen if food particles would find there way into your glass jar.  It is just a precaution.  We work hard to make K'cha, we want to be as careful as possible to ensure it is safe for us to drink.

Monday, July 9, 2012

Kombucha--Part 1 Growing a scoby

This is what I am currently working on, thus blog worthy.  (and a good place to keep all of my notes.  :-)  )

With the help of my amazing, friend Mackenzie (check out her blog here) I am attempting to grow my own scoby to make Kombucha.

First, a little preview of Kombucha and what a s.c.o.b.y. is.....

Kombucha is an effervescent fermentation of sweetened tea that is used as a functional food.  In, short, Kombucha is a healthy version of pop (without high fructose corn syrup, artificial coloring, artificial flavoring and aluminum).  It is loaded with probiotics, aids in digestion, helps detoxify bad stuff out of your body, is a dramatic immune system booster, can help prevent cancer, can help the body eliminate the chemotherapy from the bodies of chemotherapy patients.  You can make it yourself (very easy and inexpensive) and it tastes great!  


A scoby is also known as a Kombucha culture.  S.C.O.B.Y. stands for Symbiotic Culture of Bacteria and Yeast.  They look sooo bizarre!  You might think they look a little gross, they do, but that's ok.


Buy a GOOD quality of Kombucha first.  Not the Wonder Drink brand.  I bought this and it must have been a old, watered down Kombucha because even after 1 month my scoby never grew.  I had two tiny ones about the size of a dime.  Instead of one large one that should have covered the top of the liquid.  I highly recommend the brand GT's Enlightened Organic Raw Kombucha Original.  Do not buy a flavored bottle, you want Original, no natural flavoring to grow your scoby.  Swirl the bottle around while you are in the store, you should see stringy stuff in the bottle.  If you do, buy that one.  There may be scoby's already starting to grow in your bottle!!  Merry Christmas...that is a REEEAlly good bottle!! See picture below. 
Look!!!  There is a start of a scoby in this one!!!!!  Soo cool!


Ok, so here we go...
1 16 fl oz bottle of GT's Organic Raw Kombucha, room temperature (Downtown Farm Stand, Whole Foods or online)
1 cup water (reverse osmosis or filtered is HIGHLY necessary)
1/3 cup organic sugar from sugar cane (not the bleached white sugar we grew up on)
3 tea bags (organic tea here.  black, green, oolong, anything you like here)
1 glass jar (small one, enough to hold 3-4 cups) (do NOT use antibacterial soap to clean this glass jar before use)
Dish rag/towel/scrap of material
Rubber-band
Thermometer, if you have one (I bought a little one from Wal-Mart a long time ago that also measure humidity)


Here is a pic of what I use.....


Let's begin!  Bring your 1 cup water to a boil, pour in your 1/3 cup of organic cane sugar.  Stir until dissolved.  Remove from heat.  Place 3 tea bags in hot water.  Set a time for 2 hours and walk away.  :-)  

After two hours, remove tea bags and add to your compost bin.  

Pour room temperature sweetened tea into your clean glass jar.  Gently roll your GT's Kombucha so you no longer see any sediment on the bottom (the bottle says not to shake, but I want all of the good stuff in the bottle in my glass jar, so gently roll).....BUT....be very careful as you open the bottle, fizz will have built up and you definitely do not want any of your precious GT's to go on the floor....turn the cap a little, wait for the fizz to settle down, twist a little more, wait, you get the picture, then pour all of the room temperature 16 fl oz of your GT's Kombucha into the glass jar with the sweetened tea.  Swirl the jar to combine the sweetened tea and the Kombucha.  

Cover with a cloth and place a rubber-band around the top.  Find a location that is consistently 76 degrees and place jar there.

Beautiful steeping tea.

Ready to grow a scoby!!! Yay!! (Picture taken July 9, 2012)


I am starting my scoby project today!  Let me know how your project goes!  I will post pictures along the way.  Keep checking back to this blog post. :-)


Look...look!!!!!
My scoby is growing!!  (Picture taken July 16, 2012)


Book/Websites/Blogs that I researched to find this info (and read frequently).....

Nourshishing Traditions by Sally Fallon
www.justtryingtolivebetter.blogspot.com
www.thehealthyhomeeconomist.com
www.foodrenegade.com
www.healthyfamilesforgod.com
www.rawmazing.com
www.rawified.blogspot.com/


Tuesday, July 3, 2012

Checking in after a long absence. :-)

Thought I had better check in.  Some of you might be wondering if I am still alive.  I am.  Very much so.  :-)


I have so many things to share with you, but honestly, right now it is just easier if you check out the blogs that I am reading as much as I can.  I thought I was green.  I really did....needless to say I have a loooong way to go.


Here are the blogs I am reading now....
www.thehealthyhomeeconomist.com
www.healthyfamiliesforgod.com
www.foodrenegade.com


I am trying to grow a scoby so I can my own Kombucha.
Raw milk is my new LOVE.
If it comes in a box and is premade or prepackaged, I am trying not to buy it.
I am leaving Whole Foods and shopping at my local organic grocery store called The Downtown Farm Stand.
I am soaking and drying all my nuts.
I am researching a food dehydrator to dry organic fruits and veggies for the winter, to dry my nuts after I soak them and to start sprouting my own grains again and dry them for future grinding.  
I am also researching a grain mill so I can grind my own fresh flour (and my own sprouted grains! so cool!)
Making some new home improvements.
Keeping up with my kids.
And all the other normal stay at home stuff.  :-)


Speaking for me and kids, we are not eating cold cereal any longer.  See the Healthy Home Economists blog.   Today, I am making a batch of my own cold cereal.....soooo excited.  It smells so good baking.


So, pretty much that is a synopsis of what has been going on in my life for the past few months.  :-)


Take care and make a decision to go a little greener today. 


Popular Posts

Total Pageviews