Sunday, August 18, 2013

Please Stop Buying Meat at the Grocery Store!

Let me introduce you to Kyle and Emily Becker.  Click here to see their awesome website.

Seriously consider buying your meat from Becker Farms and not at the grocery store any longer.  You have no idea how the animal was raised that you are buying and eating from the grocery store.  Get back to the basics and KNOW your farmer and KNOW how the animal is being raised and slaughtered.

We buy 95% of our meat from Kyle and Emily (I give 5% to the organic boneless breasts I occasionally buy at Costco and rare shopping trips by my hubby).

Today was "The first annual Becker Farms Open House."  We had a tour time of 2:30p.m. 

We arrived and were warmly greeted by the beautiful Emily Becker.  They had set up a tent with fresh cantaloupe, watermelon, cookies, milk, lemonade and water.  A special treat was we got to take the tour with our great friends Leslie and Rick.  (yay!  Love you both.)

Before we had started the tour someone had made a comment about a calf being born.  From where I stood I glanced out onto the field and could see about 6 inches of two calf legs protruding out of the back end of momma cow!  It was amazing!!  I immediately was transported back to my childhood.  We had a farm and raised cows and horses and it was AWESOME!!  I didn't realize how great of a life I had life at that young age, but trust me now I get it and I miss it.  A lot.

So, obviously everyone who was there for the tour was mesmerized and in awe at the awesome display of life that was right before our eyes.  It was AWESOME!!  We didn't get to see the actual birth but it was still something amazing to be there and I was thrilled that my kids got to witness this amazing gift of life and to feel the excitement of God's miracles.

Momma cleaning her new baby.
So, the tour started with the baby chicks.  Ahhhhh so cute.  Then we walked to the laying hen house.  Soooo cool!  And I made a friend in the chicken coup.  As I started to walk out of the coup, I realized that I couldn't move my.  I looked down and the shorts that I was wearing had two strings hanging down on the sides of the leg and one of the amazing little chick girls took a liking to my strings.  She scared me at first and then I thought it was funny as she continued to peck and bite at my strings.


Then we visited the ducks, turkeys and hogs.  And of course every chance we could we had to check out how momma cow and her new calf were doing.  It was so amazing to watch the newborn calf make attempt after attempt to get up on those 4 wobbly legs.  He was taking a nap from the exhaustion of trying to get up when we left, so I didn't get a picture of him walking.


Look close, the turkey's are running towards Kyle.  It was funny.


Piggy tail.
We got to meet Chuck.  Chuck is a chicken who thinks he is a duck.  He lives with the ducks, eats with the ducks and who knows, may walk like a duck.  Just kidding, he walked like a chicken.
Meet Chuck.
So, anyway you get a touch of Becker Farms.  It is real.  It is the way things should be.  Now to let you know why I am really writing this.

WE HAVE TO GET BACK to the basics, we have to have a relationship with our FARMERS!!!!!  We need to purchase directly from our farmers.

We have completely lost the relationship with our food.  We don't think about or for some of us, even care how our food gets to the grocery store.  Is the animal really free range?  Are the animals in a building with 3 million other animals of their type stacked on top of each other, living in their own poop?  Are they picked up for processing by a machine that looks like a combine sucking the chickens in for processing?  What did the cow eat that you are now eating?  What hormones, pain pills, antibiotics are in the meat you are chewing in your mouth right now?  Did the farmer even care about the animals or does he/she simply see dollar signs when he looks at his animals?  Does your farmer care about what he or she is selling to you?  Does your farmer care about your health?  I could go on and on for a week.  You don't know the answer to these questions when you buy meat from the grocery store.

I met a farmer that does care and does it the right way.  And his name is Kyle Becker.  

Of course I knew he was going to be awesome when I heard where he went to college for Veterinary school (BOILER UP!!).  And the fact that he raises grass fed beef....I was sold!  (Thank you to my friend Jessica for introducing me to Kyle and Becker Farms.  Because I haven't looked back.  We actually had to buy a second deep freeze, lol, but that's ok.

Here is what we buy on a regular basis when we start running low in the deep freeze:
1/4 of a grass fed beef (cut the way we like it and DELISH!)
1/2 pig (we had given up pork completely.  until I met Becker Farms.)
Chicken breasts (they have boneless and bone-in)
Ground chicken
Ground turkey
And we always need extra BACON and Ground beef!!!!!!

Here is why I buy Becker's beef:
It is GRASS FED in the summer and forage fed in the winter (just google "why eat grass fed beef" and you will be amazed at the number of posts there are out there on this topic).  The way a cow is supposed to be raised in my opinion.  A cow was not meant to have a diet of genetically modified grains and corn nor to be stuck inside a building year round.  Grass fed cows produce the most nutritious and delicious meat I have ever tasted.  And when you can buy a 1/4 beef the prices are great.  If you can't buy a quarter their prices are competitively priced with grass fed beef today.

Turkey, Ducks, Chickens and Hogs:  They are fed a non-GMO Corn, non-GMO Soy, Organic Kelp and Mineral diet.  They chickens and turkeys get to forage around the field, stretching their wings, happy as a chicken and turkey can get eating bugs and sun bathing.  The hens get oats added to their diets.  Without the corn and oats the chickens are very underweight.
  
You and your family will be much healthier if you buy your meat from a local farmer who actually cares about his animals.  Look at your life.  Are there any area you can cut to free up money for you to use on healthier food? I hope so.  I want the best for you and your family.  And so does Kyle and Emily Becker.

So, get back to the way it was.  The way it should be.  Find a farmer locally, that you can go visit, and see how they raise their animals.  Ask what they feed the animals?  Do they feed them genetically modified feed (GMO)?  Just ask questions.  Find out where you meat is coming from.  And IF you continue to buy your meat from local grocery stores than I challenge you to watch Food Inc. before you buy another item.  You can watch it here for a few dollars.

And if your stomach can stand it, watch this video from Chris Beat Cancer.  I will admit that it was a little difficult for me to watch this video.  But the truth is, this is the way your meat is being processed.  But if you are buying all of your meat in a grocery store, this is the torture and hell your animals are going through.  I am in no way, a vegetarian   I firmly believe that God gives us animals to eat.  But I also know there is a right and a wrong way to care and slaughter an animal.  There is a humane and a non-humane way to care for and slaughter an animal.  This video answers the question of "Do you know where your food comes from?"  And just a side note, I don't drink milk from the grocery store either.  So, the way the video shows the cows being treated is NOT the way my cows are treated.  I, once again, know my farmer where I buy my milk.  There is a lot of peace in that.  A lot.

See the pattern?

Simply put, if you haven't seen the face and said Hi to the farmer that sells you your meat.  Start.

Kyle and Emily Becker
http://www.beckerfarmsin.com/
On FaceBook https://www.facebook.com/beckerfarmsin  
Kyle's cell: 765.714.4457

Becker Farms set up at our local Summer Farmer's Market, the first Saturday in April to the last Saturday in October.  And at our Winter Farmer's Market from the third Saturday in November thru March.  Check out Kyle and Emily's website for more info.  They also list the all the Farmer's Markets they set up at.  You can buy a la carte at the Farmer's Market or call Kyle to buy larger amounts.  And soon you will be able to buy online.  Very cool.

So, take that grocery list that you write for yourself every week and go buy your meat from Becker Farms.

They also have a great CSA available too.  If you are interested contact them.  Trust me you will not be sorry when you taste.


Keep trying to live GREEN,

Saturday, August 3, 2013

Easy Homemade Toilet Bowl Cleaner

So, I have a confession.  I HATE cleaning toilets.  H  A  T  E   

Yes, I know I should be blessed that we have indoor plumbing, yadda yadda yadda but I procrastinate cleaning our toilets to the point that it is VERY obvious they need cleaning.  

Then, I reluctantly make my way to the cabinet to get my wowgreen toilet bowl cleaner (which by the way wowgreen has sadly fallen off of the face of the earth, I have grieved this and finally moved on, by the way).  Spray it in the toilet, let it set and do the scrub thing with the poky brush thing.  And I have a container of Seventh Generation wipes that I use to clean the outside of the toilet, seat, lid, etc.

By the way, I also have a "thing" that I have to scrub my toilets right before I get in the shower, because the idea of scrubbing a toilet and then preparing dinner just grosses me out.  BIG TIME !!  (sharing one of my many idiosyncrasies with you all)

So, a couple of days ago I went to the cabinet to get my wowgreen toilet cleaner and guess what??  The bottle is empty.  Great planning on my part, right?  

So, I think to myself....why can't I make a toilet bowl cleaner myself?  There has to be a doTERRA oil that makes a rockin' toilet cleaner, right?  The answer to that is a big, HUGE YES!  :-)  And it is sooooo easy.

So, here's the deal-e-o.....

Ingredients and supplies:
1 8 oz cobalt blue or amber glass spray bottle (I buy mine here)*
10 drops "do" OnGuard essential oil (buy from me :-) )
1 cup Distilled White Vinegar
1 cup Baking Soda
1/4 cup Morton Salt (the only place where I use this kind of salt...BUY sea salt that is not pure white to cook and eat with)


1.  Mix the vinegar and OnGuard essential oil in a spray bottle, spray inside bowl.  I used a kitchen funnel to do this.

2.  Mix baking soda and salt together in a shaker container of some sort and sprinkle on vinegar mixture.  I used one of my Bullet cups and the sprinkle top that came with it, it works perfectly.

3.  Spray vinegar/OnGuard mixture inside toilet bowl, until you feel the inside is covered with the spray.

4.  Then sprinkle some of the baking soda/salt mixture inside the toilet bowl on top of the vinegar/OnGuard spray.  You will hear a fizzing/bubbling sound, it's kinda cool.  :-)

5.  Let stand for 10 minutes then scrub with poky brush and flush.

6.  Repeat in other dirty toilets and store for future use.

All done!!


This is the sprinkle top I was telling you about.

*You probably don't have to buy a glass bottle to scrub your toilets...yes the OnGuard will pull petrochemicals out of a plastic bottle, but since you are not drinking it, I think it would be ok.  I just had an 8oz glass, so I used it.

Keep trying to live green,

Friday, July 26, 2013

What's going on in my kitchen today?

This is too funny.  I had to share it with all of my traditional foods and GREEN friends.

When I took a breath today and stepped back and looked at my kitchen, I laughed.  Look below and you will see why.

This is what went on in my kitchen today....

Butternut squash cut up and ready to freeze (chunks and fry shape) and 4 jars of Kimchi.

Butternut, Kimchi and Kombucha on it's 2nd Ferment.

Of course I saved the seeds from the Organic Butternut Squash to plant next year!

Water Kefir Brewing.

Becker's Farm Whole Chicken Cooking to make Chicken Stock and of course shredded chicken.

My beautiful Butternut Squash Soup, part of my new sort of GAPS life.

Beautiful Kimchi!  In 3 days I get to eat it!

I liked both pictures, couldn't decide which one I like better. :-)  Kimchi again.

So, by now you can figure out why I laughed so hard today when I stood back and looked at my kitchen, I had a lot going on!  But it is ohhhhh so worth it!!!

Keep Living Green,

Sunday, July 14, 2013

How to make Ghee (butter oil, Indian clarified butter)

~This is a forgotten about post I wrote months ago.  :-) ~

I am needing butter oil.....NOW!  I am placing an order to buy butter oil from Green Pastures today.  But I need to start this in my 6 year old today and can't wait for the delivery of my butter oil.  So, luckily my local raw milk farmer had raw butter at the last milk delivery instead of raw cream.  Ironic huh'?  You know I believe that God takes care of us in small and big ways, and this is one of the small ways.

My 6 year old has a cavity.  GASP!  I know.  He eats healthy, doesn't eat sweets much and brushes his teeth daily (To be honest, I still brush his teeth daily.  He totally knows how to do it but I want excellent oral hygiene and this is how I know he is getting it).  Yet, we still have a cavity.  Hmmmm??

I remembered reading this a long time ago.  Sarah Pope, The Healthy Home Economist had actually healed her sons cavity.  So, this article was the first place I went to after the visit to the dentist this week.

So, in a nutshell she healed her sons cavity by changing 2 things.  Her son was already taking FCLO (fermented cod liver oil) every day, but he was not taking the butter oil with it like he should have been doing.  See my post "Why I Take FCLO" for more info on FCLO. So, she started making him take the butter oil each time he took his FCLO.  She also suggested that he change what he was putting on his morning 2 slices of toast.  He started putting raw honey and raw butter on his toast instead of the tahini and raw honey that he was eating every day.  In a nutshell, within 1 month....1 MONTH....that was when the dentist appointment had been pushed back to, due to various things in life that came up....the cavity was GONE!  The dentist was shocked.  So, in a nutshell, what we eat and what we are lacking in our bodies plays a major roll in our health from our hair down to our toenails.

I also read that directly applying the FCLO and butter oil to the cavity is another great idea.

So, as of today we are starting the same cavity adventure.  And I hope and pray that this will heal my sons cavity.  In time we will have our answer.

Back to Ghee.

Buy only TOP TOP quality butter to make ghee.  It has to be either local grass fed raw or low temp butter.  I get mine from my local RAW milk farmer Pasture's Delights (I appreciate you more than words can express Mark, Troy and Carrie).  If you do not have access to local grass fed butter you can buy Kerrygold butter.  Costco, EarthFare and Whole Foods Kerrygold butter.  Kerrygold butter is fantastic and is quite affordable (if you shop at Costco).  Click here to learn more about Kerrygold grass fed Irish butter.  If your butter is not yellow, it is not good high quality butter from cows who eat grass.  If it is white butter there is little to no nutrients and vitamins, at all.  You want beautiful yellow butter.  And sorry to say, but if you are buying organic butter and it it white, well......you guessed it, it is highly lacking in omega-3's and beta-carotene.  You have to read "The Untold Story of BUTTER" to truly understand what I am talking about.  I am also currently working on a butter post to take all of this further into detail.


Ghee is great for someone who has a dairy or butter allergy.  All the milk solids are removed, all the protein, casein and lactose are removed when you make Ghee (obviously the same goes for the butter oil from Green Pastures.  Ghee does not need to be refrigerated, you can keep it in your pantry for many months.  You can refrigerate it if you want but you don't need to.  Ghee has a high smoke point and you can use it for frying.  It is similar to coconut oil in this aspect.

What you need...
Butter (raw grass fed, low temp grass fed, or Kerrygold) I used 8oz raw grass fed
Glass Pyrex bowl
Slotted spoon
Coffee filter or cheesecloth
Funnel
Glass jar to store ghee in

Bring butter to a boil, over medium heat (no higher), in a glass Pyrex bowl, on top of your stove (yes Pryex is safe to do this with.).  After the melted butter begins to boil wait until the entire surface area of the melted butter is covered with a white foam and you are still seeing little bubbles in the butter.  Once the entire surface of the butter is covered in the white foam, use a slotted spoon to remove as much of the white foam that you can.  Place foam in an additional small bowl and set aside.  Reduce heat (I went medium low), allowing the butter to simmer for an additional 10-15 minutes.  When the butter is completely clear, and you can see the milk solids on the bottom begin to slightly brown,  your ghee is ready to separate.  Turn off your heat.


Starting to boil.
The foam that you scrape off.
Place a funnel in a glass jar with a coffee filter or cheese cloth inside the funnel.  Carefully pour your butter into the funnel.  DO NOT scrape the milk solid or the butter into the funnel!  Leave the milk solids in the bottom of the Pyrex bowl and discard.  Allow the butter to drip through the funnel until the coffee filter no longer has any butter in it.  I let mine set for 10 minutes just so I got all of the butter out of the funnel.  You don't want to waste 1 drop!  Now you have ghee!


Milk solids left in the bottom of bowl.  Don't scrape the bowl!
Beautiful. Isn't?
It is recommended that you take 1/2 tsp butter oil (ghee) when you take your 1-1 1/2 tsp of fermented cod liver daily.  Take them together at the same time. 

Ghee also tastes WONDERFUL drizzled over your homemade popcorn, popped in coconut oil.  ;-)

Sarah puts her butter oil into gelatin capsules, immediately after straining, that you can buy at a health food store.  I am going to just use one of our clean syringes that came with my fermented cod liver oil and shoot it in the back of our tongues.  This will require placing our glass jar of homemade ghee in warm water and allow it to return to liquid.  This will also depend on what temperature you maintain your home.  We keep ours fairly cool, thus the solid state of the ghee.

There you go!

I will post back later to update you on my sons cavity, or hopefully lack there of.

Note:
The reason why I am still ordering butter oil from Green Pasture's is due to the way they make their butter oil.  They use a process that still allows the butter oil to remain raw called centrifuge.  Which means more nutrients for my family.  It majorly depresses me that I "cooked" our raw butter, but that was the highest quality of butter we have in the house and want this cavity gone yesterday. 

Update:  To date my kids will not take the butter oil from Green Pasture's.  They refuse.  So, I sold it to a friend.  Now, when I can get them to take the butter oil, it is my homemade ghee.  Some days I can't even get them to take the ghee, so they get a piece of toast slathered in butter or a heaping teaspoon in their hot soaked oatmeal for breakfast.

Update:  And we are now alternating back and forth between Green Pasture's FCLO and doTERRA's IQ Mega.  Two great products in my mind.  I will write about the IQ Mega in the future.

To watch the full video from Sarah on how to make Ghee, The Healthy Home Economist, click here.  And please read Sarah's blog.  It is full of amazing and profound knowledge (some controversial but I can take it. lol).

Sourdough English Muffins from Five Little Homesteaders

This needs to be filed in a safe location for future use, thought my blog would be a great place.  :-)

Five Little Homesteaders: Pantry Revamp: Sourdough English Muffins: This recipe for  sourdough english muffins  is part of the Pantry Revamp series here on Five Little Homesteaders.  To read more about it, ch...

Keep trying to live green, 

Thursday, July 11, 2013

My Facial Routine

One of the most common questions I get is "what do you use to wash your face?"  I always laugh and tell them that they can find the ingredients in their kitchens.

Here is what I do every day of my life.  :-)

Facial Cleanser (a.k.a. OCM (oil cleansing method))  A friend of mine wrote a great post about it and she got me started a long time ago (Thanks Mackenzie!) The original recipe used Castor Oil, but there is some new research that makes me uneasy about Castor Oil.  So, when I have used up my Castor Oil I will be switching to Avocado Oil.  :-)

2 Ingredients:
Organic Extra Virgin Olive Oil
Avocado Oil* (see list below to choose the best oil for your skin)
(I use a 1 oz measuring shot glass I bought at Walmart a long time ago)

Depending on your skin type (*refer to list below to choose the best oil for your skin), this is what you do.....
For dry skin use 1 part avocado oil to 3 parts extra virgin olive oil
For oily skin use 3 parts avocado oil to 1 part extra virgin olive oil
For normal skin use equal parts of each oil.  This is what I use.

I bought a cool 4 oz cobalt blue glass bottle with a glass dropper that stores inside the glass bottle and serves as the lid.  I love it.  I bought mine at Whole Foods but you can also find them here.  This is AromaTools website, I LOVE this website and use it all of the time for my doTERRA biz.  

You can add essential oils here at this step, if you are storing the oil in a glass bottle (no plastic with essential oils!).  There are a million things you can do with essential oils here.  For example, if you want a good facial cleanser you can add peppermint or melaleuca.  The list goes on and on...skin tightening....pore reducer....extra hydration....anti-aging, etc etc.  And of course if you know me, you know that doTERRA essential oils are the ONLY essential oils I will use in or on my body.  Want to learn more about doTERRA go here.

I prefer to use this in the shower.  Place a nickel size amount in the palm of your hand (before you get your hands really wet) rub between your hands to warm the oils, then apply all over your face, eyelids and neck (before you get your face wet).  Continue massaging and rubbing the oils into your skin for a minute, concentrating on any problem areas.  Get your wash cloth really wet with really hot water, but don't scald yourself.  Lay the washcloth on your face and just stand there for a minute, letting the heat from the wash cloth push the oils into your open pores.  Then flip the washcloth over and wipe the oil away, rinse your wash cloth and repeat until you feel like all of the oil is gone from your face.

Now, I will tell you, from where you are starting in your life, switching to OCM will be a road easily traveled or it may be one filled with potholes.  Meaning...when I switched to OCM I had a few small breakouts, but I kept going.  Now, I have the clearest skin I have ever had in my life (and people actually comment on it, which is pretty cool) -minus one time a month where I occasionally develop a pimple or two-somethings seem unavoidable, right?  :-)  On the other hand I have heard of people REALLY breaking out with acne.  But please try to stick to it.  It may take months to clean out your pores completely.  Or sad to say, OCM just might not work for everyone, every time.  But give it a try and let me know what you think.  


My Facial Moisturizer
Organic virgin coconut oil.  Truly, I prefer Tropical Traditions Gold Label brand.  I like the company and I like their products.  But my second in command is Costco's Organic Carrington Farms coconut oil.  That's it!!  Rub a little dab in the palm of your hand and apply over your face, eyelids and neck.


My Eye Makeup Remover
Organic virgin coconut oil.  I use organic cotton makeup pads (you can buy them at Whole Foods and EarthFare), put a little dab of coconut oil on the makeup pad and work it in all over your eyelids.  A friend of mine says it makes her eyes a little cloudy feeling afterwards, so I would recommend gently wiping your eyes with a wet washcloth and/or using eye drops to clean out anything left behind in your eyes.

If you need a reminder of how AWESOME coconut oil is click here.  

*Oil choices if you do not want to use Avocado oil or have other skin conditions....
Almond Oil (sweet) - Softens, soothes and reconditions
Avocado Oil - Rich in essential fatty acids (EFAs) and Vitamins A, B1, B2, D, and E;
good for those with psoriasis, eczema
Borage Seed Oil - Reduces inflammation and calms skin, promotes blood flow, good for eczema, acne, and rosacea
Grapeseed Oil – Absorbs easily and is non-allergenic. Good for those with skin sensitivities (I have to research more here, I thought Grapeseed had a bad rap.....??)
Hazelnut Oil – Astringent, good for oily skin
Hemp Seed Oil - Nutrition for your skin – antioxidant, protein and mineral-rich. Contains Vitamins A, B1, B2, B3, B6, C, D, and E

DIY Organic Beauty Recipes by Heather Dessinger


Keep Trying to Live GREEN my Friends!

Monday, March 25, 2013

Why I Take Fermented Cod Liver Oil (this will surprise you)

****Update 2-25-2016   We are no longer purchasing from Green Pasture.  Information has surfaced that the FCLO is actually toxic.  Google it....there's a ton of info.  Cheeseslave has a lot to say about it too here. Wonderful, right?!  How long did we take this?!  I am now using doTERRA's Life Long Vitality and the kids are taking doTERRA's IQ Mega.*****


My current passion has been studying Fermented Cod Liver Oil (FCLO).  Sounds fishy doesn't?  Sorry, couldn't resist.  Lol

Remember back when everyone was talking about fish oil and how you should be taking it?  Well we listened, sorta.  I just donated 1 very large bottle of our fish oil capsules to our local soup kitchen.  We took the fish oil capsules, sorta, for a while.  Then stopped.  Didn't really feel a difference so we stopped.  The reason we didn't feel a difference?  The stuff we were taking was crap.

Now that there is so much noise about FCLO I had to buy some, start taking it and start doing some heavy research on the subject.  So, here is what I found.

Why should you take FCLO?
-decreases bad cholesterol
-increases good cholesterol
-can heal cavities (When taken with butter oil.  I will go further into detail later on)
-can prevent cavities
-can prevent illness (colds, flu)
-can boost your immune system
-can decrease the healing time from a cold by at least 1/2 (I know from experience)
-give you more energy (definitely agree with this!)
-when given to young children, can prevent or decrease the future need for glasses and braces
-very nutrient dense
-great source of Vitamins A, E, K and D
-fermented (good for your gut)
-decreases inflammation
-full of omega 3's (EPA and DHA)
-can fight infections
-it has never been heated, which retains all the vitamins and nutrients available
-consistent testing occurs to insure the FCLO is mercury free
-cod are wild caught
-helps fill in the holes (if I don't eat our healthy foods at home every day I know I am still covered)
-can help with infertility issues
-if taken before you get pregnant can increase health in your baby exponentially!
-it does not taste bad at all, trust me here me and my 2 kids take the liquid form no problem.  I have heard that the fermented tastes better than the old formula which was very fishy.

Where do you want to buy your FCLO and butter oil?  Once place...Green Pasture.  And Radiant Life carries Green Pasture products for a little less money and shipping (and right now they are offering 10% off!).  Just make sure the bottle reads Green Pasture.

Why do I need to buy Fermented cod liver oil?  Why can't I just buy cod liver oil?  There is a real difference here.  Fermenting the fish and fish livers is an ancient practice.  The resulting oils were considered sacred.  "Many great cultures had one sacred food in common which they relied upon to ensure strong mind, body and spirit of their people.  The Mighty Roman Soldier consumed a daily ration of fermented fish oil.  The Stoic Scandinavian Viking kept a drum of fermenting cod livers outside he door of his home.  Even Grandma had the wisdom to keep a bottle of cod liver oil in her cupboard."(1)  
Fermenting is a natural procedure that takes months.  Cod liver oil that is not fermented and from Green Pastures has been heated to speed up the process of acquiring the end result, cod liver oil.  Heating kills and destroys the nutrients and vitamins your body needs.  So, in a nutshell but fermented, don't waste your money on cod liver oil that has been heated. 


Dosing-recommended to take first thing in the morning
Adults
1-1 1/2 tsp each day
plus
1/2 tsp butter oil each day

Kids
1/2-1 tsp each day
plus
1/2 tsp butter oil each day


The first bottles we bought from Green Pasture was their Blue Ice Arctic Mint Liquid Fermented Cod Liver Oil and their Blue Ice non-gelatin capsules.  And believe it or not but myself and my 2 kids take the liquid without a problem.  The liquid comes with a syringe.  I have the kids open their mouth, tilt their head back, stick their tongue out and I squirt the FCLO at the very back of their tongue.  Then they take a drink of raw milk.  No problem at all.  Makes me very proud of them.  Hubby didn't think he wanted to try the liquid so we got him the capsules, no prob.  :-)


I do not recommend you take the FCLO without the Butter Oil.  The butter oil helps the body absorb as much of the FCLO that your body can.  Without the butter oil, you are getting benefits from the FCLO but not like you do with it.

If you don't want to spend the money on the butter oil, make your own.  It will not be as "perfect" as the butter oil is from Green Pasture's but it will be close.

Here is how you make you own butter oil or ghee (this will be up tomorrow).  Thank you Sarah Pope at The Healthy Home Economist.


*Information gathered from the following resources...
-Sarah Pope's ebook "Get your fats straight."
-Green Pasture website
-Radiant Life website
-Wise Traditions The Cod Liver Oil Debate by Chris Masterjohn
-The Healthy Home Economist website
-And of course my own personal experience
-Even though I have not finished reading it yet, Dr. Weston A Price's book titled "Nutrition and Physical Degeneration" is the foundation to all of this information.  I did find a website that was offering his book to read for free as an ebook, click here.  
(1)-Quoted from Green Pasture


For a little cod liver oil humor, click here.

And if you would like to hear the cod liver oil songs, click here. 

Keep trying to live green. :-)


Saturday, March 23, 2013

Homemade Yogurt Push Pops

Seriously, I am so eager for SPRING to really get here.  I am aware that the calendar hanging on my refrigerator says that spring is here, but when I walk outside I begin to doubt my calendar.  Or maybe it is global warming, who knows?  Anyway, in my STRONG anticipation of warmer weather, I created these sweet little babies and I vowed today to stop wearing long sleeved shirts.  That is, until the predicted 12 inches of snow fall on the ground overnight.  Grrrrrrrrr.......  Then my long sleeved shirts may, just maybe, will end up over my head again.  :-)

My boys sampled the push-pops today with delight.  And trust me, they were soooo easy to make.  So, I no longer have to buy their organic yogurt sticks, I can make them.

I made two different types.  Chocolate honey and strawberry honey.


Here's what you need.....
-Whole/Full fat Organic Stonyfield plain yogurt (buy plain so you can control the sweetness level)
-Organic Fruit (frozen or fresh, pureed in bullet, blender or food processor)
-Organic chocolate syrup
-Local honey (raw that you slightly warm till liquid or local that has been warmed to the temperature below raw, ask your bee keeper for specifics)
-Push pops (I bought mine here from Amazon)

Pour desired amount of plain yogurt into a glass bowl.  Add desired amount of chocolate syrup and honey, stir well.  Pour into your clean push pop container.  Place in freezer
or
Pour desired amount of plain yogurt into a glass bowl.  Add desired amount of pureed organic strawberries and honey, stir well.  Pour into your clean push pop container.  Top with a slice of fresh strawberry.  Place in freezer.


I did not add the stick to the push pop until the yogurt was completely frozen.  This allowed for easier storage in my freezer.  When the boys wanted to try one today, we removed the push pop from the freezer, allowed it to set out for a little while and then stuck the push pop stick in the bottom of the push pop container.

Now, I will admit these were slightly more "icy" than the already made Stonyfield yogurt sticks we buy, I need to further research this to see what makes the commercial brand smoother.

Let me know when you try this recipe and what your family thought.  :-)


Wednesday, February 20, 2013

Making my own Sauerkraut! (super excited!)

Ever since myself and 3 of my gal pals went to the conference in Indy in September 2012 I have been very curious about the process of fermenting.  While we were there we went to a break out session that showed us the process.  It was very intriguing to me.

So, needless to say, months later, my friend Tammy and myself finally have pulled everything together that we need to start the process of fermenting.

Let's talk a little about fermentation.  Most of you think BEER!  Yes, that's fine, that is fermentation too.  This is a little different.  Most of the American, 'oh so' unhealthy food we buy off of the shelves in the grocery store (notice I said shelves, meaning those things called "food" in a box or pre-packaged) have little to no nutrition in them.  And most of the nutrition that is in them has been added back in artificially   Why, you ask?  Because the process that created that 'oh so cute' little package for you killed everything good in it.  So, you buy it.  Take it home, add boiling water to it.  And eat it.  Yes, your stomach feels full.  But every cell in your body is still SCREAMING and craving nutrients, vitamins and minerals.  Your cells think "well he or she put something in me but I am not pulling anything good out of it, what is going on here?"

So, in a nutshell, this food is dead.  DEAD FOOD.  Sound delicious?  I don't think so.

So, we need to add foods to our diet that help our bodies.  A better idea?  Start eating traditional, unprocessed foods.  But even if you are eating 100% traditional and non-processed foods, adding fermented foods to your diet is still a must.

Our body has a lot of bacteria in it.  Now, I don't mean the stuff you see growing on that piece of food you left in the back of the refrigerator for over 6 months ago that has turned black.  I mean the good bacteria that keeps everything moving and you healthy.  You know, that bacteria that is in your gut and intestines, that keeps your entire body healthy when present.

Well, when we eat that DEAD FOOD, we kill the good bacteria and cannot replenish it.  So, what do we do?  We find a food that we can incorporate into our diets that will give us some of that bacteria back (and we change the way we eat and stop eating out 6 days a week...and stop buying that processed crap that comes in boxes.  you want hamburger helper?  make it yourself.  it doesn't take any longer!  want a recipe?  let me know.)  :-)

We started with Kombucha.  Which you can read about here and here.

And me and my kids have been drinking it for months now and we LOVE it.

But now it's time to add something else.  I LOVE sauerkraut.  So, now enters my latest adventure.  :-)

Items to purchase:
1/2 gallon sized ball glass jars
Pickle-pro vegetable fermenting lid
Glass weights
Caldwell's starter culture
2 organic heads of cabbage
Sauerkraut pounder or Fermenti Artisan in Indianapolis is where I bought mine (see picture below)

Additional items:
Sharp knife
Cutting board
Timer or watch
2 tablespoons Redmon's sea salt
2 cups room temperature reverse osmosis water
Wide mouth canning rings


Then this is what you do.

Remove the 2 outside layers of cabbage from each cabbage head, throw those away and cut out the core and throw that away.  Cut up the heads of cabbage as fine as you want them.


This is how much 2 heads yielded.  This is the largest bowl in my house.


Then you dissolve 3 tablespoons of sea salt (I used Redmond's) in 2 cups of room temperature r.o. water and stir well.  


Dissolve the contents of the starter culture pouch in 1 cup of room temperature water and let the solution sit for no more than 10 minutes!!!!!  This is how the culture is activated.

      
After your 10 minutes have passed stir the solution and pour over the top of your cabbage.  Also stir the salt/water mixture and pour it over the top of the cabbage and stir like crazy!  You can use your washed hands or you can use a large spoon and mix for 10 minutes.  You want to make sure the solution and salt water are all over your cabbage in order for fermentation to be effective.


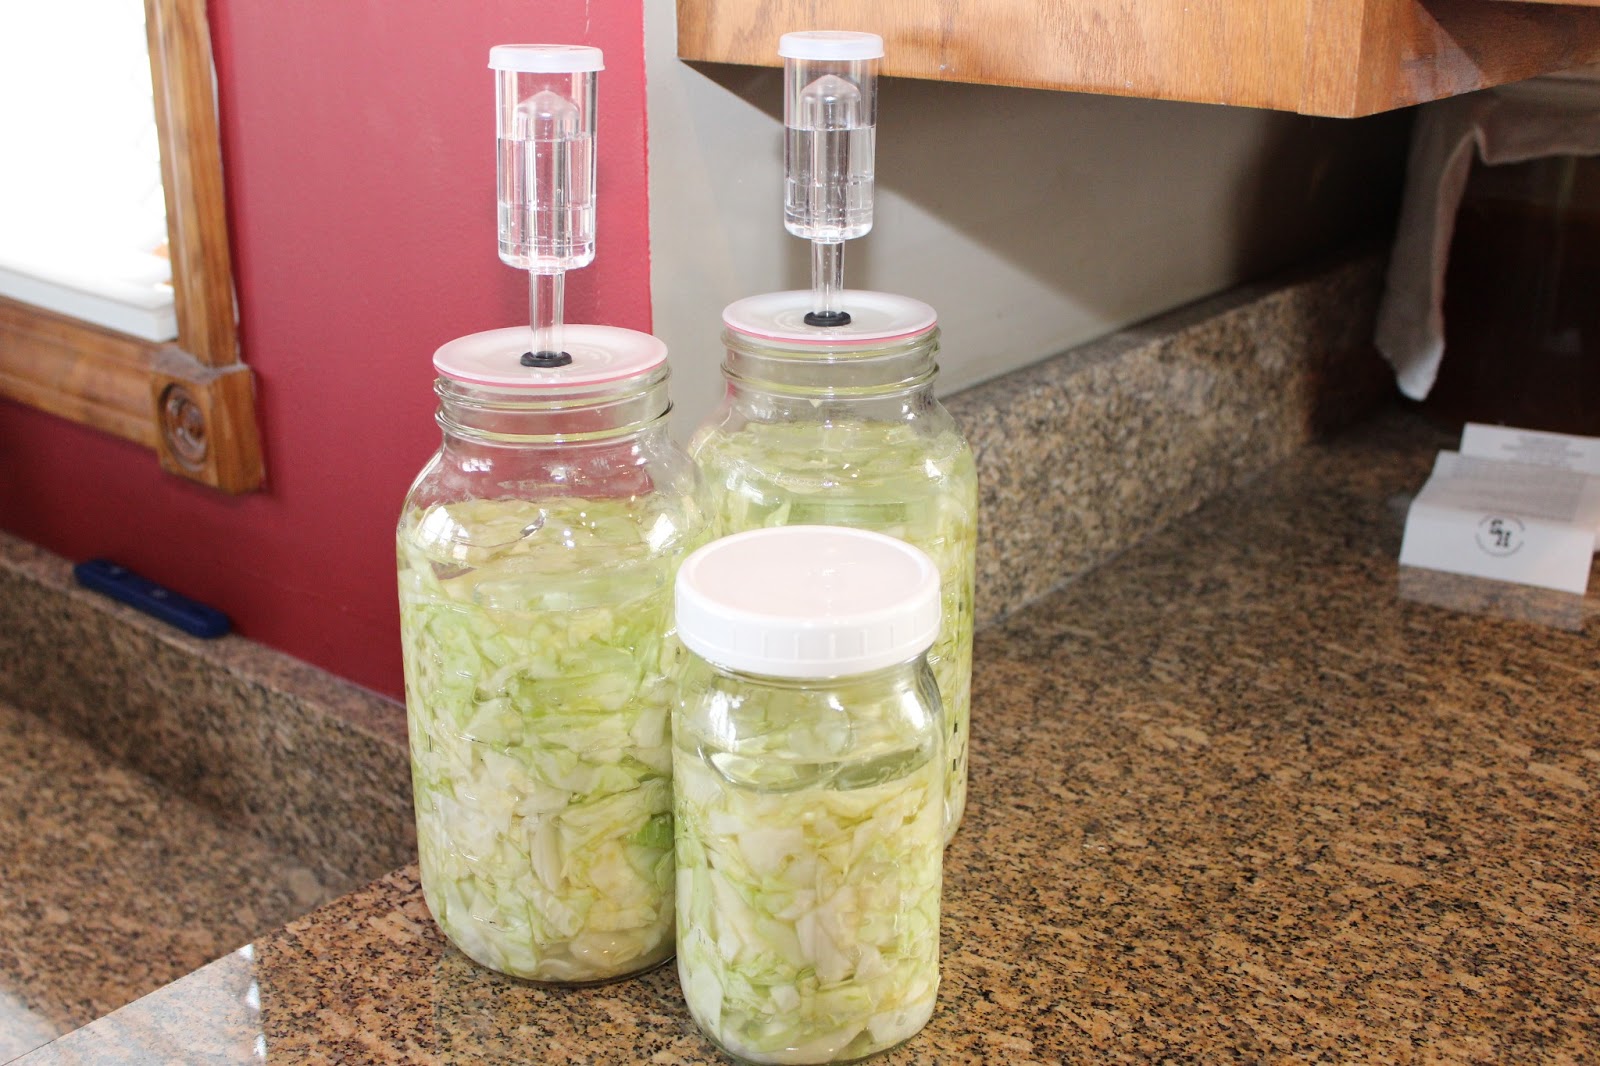
After your cabbage is covered in the salt water and culture solution begin packing the cabbage into your glass container.  Using your sauerkraut pounder to remove air bubbles and fit almost an entire head of cabbage into your 1/2 gallon glass jar.  I seriously couldn't believe how much cabbage I could fit into 1 jar!


Allow the juice to cover the cabbage, leaving a space of 1 inch of air above the juice.  Place your glass weights on top of the cabbage to keep the cabbage submerged at all times.  Place your pickle pro fermenting lid (with rubber seal on first) on top of your glass jar.  Seal it tightly with a canning ring.  Remove the top of the airlock, add reverse osmosis or filtered water to the fill line.  Replace the top of the airlock.  And voila!  The fermenting process starts immediately!!! 


I only had 2 pickle pros so I just added a plastic canning lid to the quart jar.  The only rule that is different for a regular plastic lid verses the pickle pro is that you do not tighten the regular lid until the end of fermentation, which is 10 days.

Store the glass containers at room temperature for 7 to 14 days.  This time is required for bacteria to start to grow from the starter.  

At the end of your 7-14 days (I went the full 14 days) place your glass containers in a refrigerator or a cool room for 6-8 weeks (40 degrees F or 4 degrees C).  The longer you let the sauerkraut ferment, the tastier it will be.  You can eat the sauerkraut at the end of your 14 days but I want the full flavor so we are going 6-8 weeks.  And there is a mellowing period that is achieved the longer you wait which gives you better tasting sauerkraut.  Note:  Make sure you are marking these dates on a calendar so you know when to check your sauerkraut.

At the end of the 6-8 weeks you can repack the sauerkraut in smaller containers, vacuum seal packs or freeze for long term storage.  


Now for the hardest part............ waiting.  :-)  I will post when I open and try my sauerkraut.  I can't wait!

Happy fermenting!!

*Other vegetables that can be fermented include beets, carrots, turnips, parsnips, black or daikon radish.

And I highly recommend you visit www.caldwelllbiofermentation.com which is a great website.  And I huge thank you to Fermenti Artisan for giving me my first lesson in fermenting.  

Popular Posts

Total Pageviews